

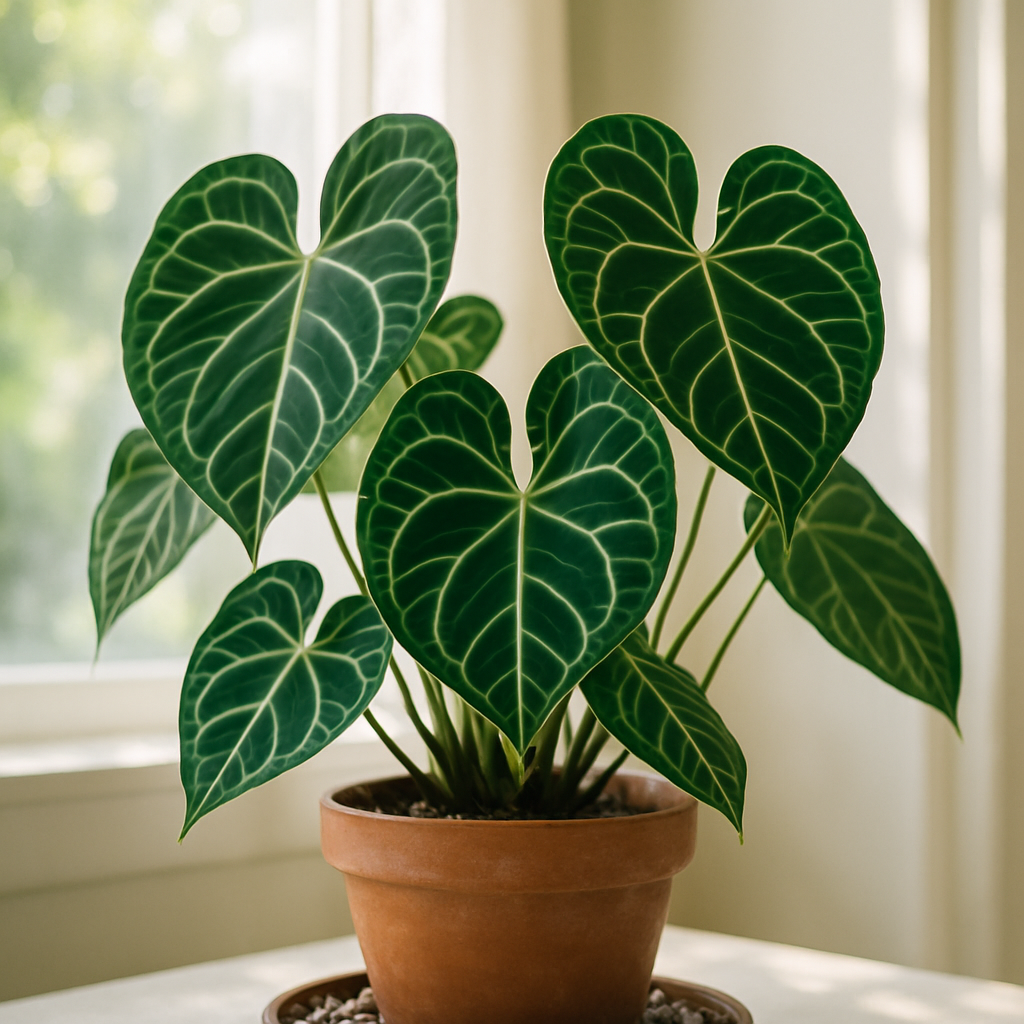
Anthurium Clarinervium Care: Step-by-Step Guide to Growing This Stunning Aroid
There’s something almost magical about the Anthurium clarinervium, isn’t there? Those velvety, heart-shaped leaves with their striking white veins—it’s like nature’s own piece of art hanging right in your living room. But if you’ve ever found yourself staring at your plant wondering why it’s not thriving like those glossy Instagram pics, you’re definitely not alone.
So, what’s the deal with anthurium clarinervium care? Why does it feel like a fine balance between keeping a delicate treasure and a tropical jungle explorer all at once? Well, it’s because this beauty demands more than just watering and sunlight. It needs the right atmosphere, soil mix, and a little bit of attention tailored to what it really wants—not just what a generic plant care guide says.
Here’s the thing: anthrium clarinervium isn’t just any plant. It’s a bit of a diva, sure, but it’s also incredibly rewarding when you get its care just right. From humidity levels that remind it of the tropical cloud forests to soil that can drain fast but hold moisture just long enough, this isn’t guesswork. It’s about understanding your plant’s natural vibe and working with it.
Maybe you’re asking, “Where do I even start?” It’s a fair question. You probably don’t want to drown it, but you don’t want your leaves to shrivel either. And what’s the best way to pot this stunner so those roots don’t scream for help underground? Trust me, you’ll want the scoop on these details before things get complicated.
That’s what this guide is all about. We’ll walk through practical steps and insider tips—little secrets we’ve learned from caring for these gems over time. And hey, if you’re curious about mixing the perfect soil, we’ve got a detailed walk-through right here to get those roots happy and healthy.
Let’s dive into the world of anthurium clarinervium care and turn your plant from overlooked to absolutely thriving.
TL;DR
Anthirium clarinervium care isn’t rocket science, but it does need a little love in the right spots. Think: bright indirect light, humidity like a tropical hideout, and soil that’s both airy and moisture-retentive.
Water it just enough to keep those velvety leaves happy—overdoing it spells root trouble fast. Pot choice matters, too; well-draining and snug is the sweet spot. Nail these basics, and your plant will reward you with jaw-dropping foliage.
Step 1: Choosing the Right Environment and Lighting for Anthurium Clarinervium
Ever picked up an Anthurium clarinervium and thought, “Wow, this is gorgeous, but how on earth do I keep it happy?” You’re not alone. These stunning velvet-leaf beauties come from tropical cloud forests, so recreating their natural vibe indoors can really make or break your success. It’s like inviting a tropical guest who’s a bit particular about their room’s lighting and humidity.
So, what exactly does the "right environment" look like for your anthurium clarinervium care routine? Let’s unpack it together.
Find the Perfect Spot—Bright, Indirect Light Is Your Best Friend
Imagine the shaded understory of a rainforest where sunlight filters gently through the canopy—no harsh rays, just dappled, soft light. That’s the sweet spot for Anthurium clarinervium. Placing your plant near an east or north-facing window, about 1-2 feet away, usually does the trick. Too close and those delicate leaves might get scorched; too far and your plant starts stretching, leaves get smaller, and growth slows.
During the cooler months, a little direct morning sun can actually be a bonus—your plant won’t complain as long as it’s not the brutal midday sun. But during the intense summer heat, you’ll want to shield it with sheer curtains or place it a bit further back. Outdoors? Full shade or filtered light mimics its natural habitat best. This little adjustment can mean the difference between lush, vibrant foliage and dull, leggy disappointment.
Not sure how bright is bright enough? Here’s a quick test: if you can read a book comfortably in that spot during the day without turning on a light, your Anthurium clarinervium will probably enjoy it too. But if you find yourself squinting, it might need a brighter perch.
Humidity and Temperature: Mimic a Tropical Retreat Without Going Overboard
Let’s be honest: turning your home into a mini rainforest isn’t always practical, but your plant still craves some tender loving humidity. Good news—Anthurium clarinervium isn’t as needy about extreme humidity compared to some of its more finicky aroid cousins. Still, keeping the air moist (think 50-60% humidity) helps those velvety leaves gleam.
If your home feels dry, especially in winter when heating systems suck moisture from the air, try grouping your plants together or placing your Anthurium on a pebble tray with a bit of water beneath (not touching the pot’s bottom). It’s a low-effort way to gently boost humidity without slathering leaves in mist—which can cause infections if the moisture lingers too long.
Speaking of temperature, aim to keep your Anthurium comfortably between 65-80°F (18-27°C). Temperatures below 60°F (15°C) can stress it out, causing leaf drops. And if your home gets hotter than 85°F (29°C), your plant might start to show signs of fatigue, like slowed growth or crisp leaf edges. Think of it as finding a Goldilocks zone—not too hot, not too cold, just right.
Airflow Matters (But Don’t Blast Your Plant!)
You might not initially think of air circulation as a factor, but it’s key. Stagnant air offers a playground for pests and diseases. A gentle breeze from a fan (not aimed directly at the plant) keeps things fresh and helps prevent fungal issues.
Just like you wouldn’t want to sit next to a fan all day, your Anthurium appreciates air moving around it but not being battered. Aim for subtle, non-visible movement of leaves, not a wind tunnel.
Wondering how to know if you’ve nailed the environment? New root growth and fresh leaves are your green flags. When those start appearing, you’re on the right track.
Wrapping It Up: Setting Your Anthurium Clarinervium Up for Success
To sum it up:
- Choose a bright spot with indirect light—near a window but shielded from harsh sun.
- Maintain moderate humidity with grouping or pebble trays, avoiding prolonged wetness on leaves.
- Keep temperatures comfy and consistent, avoiding cold drafts or excessive heat.
- Ensure gentle airflow to keep fungal nasties at bay.
If you’re curious about how to nail the perfect soil to match this ideal environment, check out our detailed guide on how to create the ideal Anthurium potting mix—it’ll make watering and feeding your plant so much easier.
Getting the environment right might feel like a juggling act at first, but trust me—it gets easier. Your Anthurium clarinervium will thank you by unfurling its magnificent heart-shaped leaves, glowing with those signature pale veins. And nothing beats that moment when your friend walks in and goes, "Where did you get that?"
Ready to elevate your Anthurium clarinervium care game? Let's make that tropical oasis happen right in your home.
For more tips on caring for these rare beauties, you might find inspiration from resources like the Folia Collective’s Anthurium care insights or Here…but not’s detailed aroid culture tips. Both offer nuanced takes on replicating the plant’s tropical needs indoors, perfect for diving deeper once you’ve mastered your spot.
Step 2: Watering and Humidity Tips for Healthy Growth
Okay, so you’ve got your Anthurium clarinervium nestled in that cozy spot with perfect light. But then comes the tricky part that trips up even the most enthusiastic plant parents: watering and humidity. It’s this delicate dance of giving your plant enough moisture without drowning it or leaving it gasping dry. I’ve been there, staring at the soil wondering, "Should I water now or wait?"
Here’s the thing — your Anthurium clarinervium isn’t a cactus. It loves moisture, but it hates sitting in soggy soil. Think of it like a tropical rainforest experience right on your windowsill, not a puddle zone.
Watering: When and How Much?
The general rule? Water thoroughly but less often. That means when you do water, soak the soil until you see it draining from the bottom of your pot. This helps the roots absorb moisture deeply rather than just the top layer getting wet.
Between March and September—the growth season for your Anthurium—aim to water about twice a week. But—and here’s the kicker—you’ve got to check the soil rather than sticking strictly to days. Stick your finger about an inch into the soil. If it feels dry, it’s thirsty time. If it’s still damp, hold off.
Winter’s a different story: your plant slows down, so watering once a week or even less might be enough. Overwatering during dormancy is a fast track to root rot, and trust me, no one wants to wrestle with that.
And don’t overlook the pot type—using glazed or plastic pots helps retain just the right amount of moisture, keeping the roots happy. Porous terra cotta pots dry out too fast for this plant’s liking.
Humidity: The Unsung Hero
Humidity might just be the secret sauce your Anthurium clarinervium needs. This plant hails from the tropical climes of southern Mexico, where air is thick and moist. Mimicking that indoors isn’t always easy, but it’s critical.
Ideally, you want the humidity hovering between 60% and 80%. Anything lower, and your plant’s leaves might start showing crispy edges or brown tips—sad signs of thirsting air. Too high, and fungal problems might crop up, so balance is key.
Can you guess a simple way to boost humidity? A pebble tray with water beneath the pot works wonders—like giving your plant its own little tropical lagoon. Just make sure the pot isn’t sitting directly in the water to prevent soggy roots.
Misting leaves a few times a week is another popular hack, but don’t overdo it. Too much surface moisture can invite pests or mildew. Alternatively, placing your Anthurium in a bathroom or kitchen, where steam builds naturally, can be a lovely low-effort humidity boost.
If you want to get fancy, a humidifier set near your Anthurium will keep the air just right almost effortlessly. They’re especially handy in drier months when indoor heating saps moisture from the air.
Keeping an Eye on Environment Fluctuations
You know that moment when your plant suddenly looks unhappy, and you can’t figure out why? Sometimes, it’s the temperature and humidity swings messing with their vibe.
Try to keep the room temperature steady—ideally between 65° and 73°F—and avoid cold drafts or sudden heat blasts from radiators. These fluctuations stress your plant and can slow its growth or invite disease.
Measuring your indoor humidity with a hygrometer (often combined with a thermometer) can be a game-changer. It gives you real data to tweak your care. When you see the levels dipping below 40%, that’s when your Anthurium is waving a little yellow flag.
Remember, healthy watering and humidity go hand in hand. If the air’s dry, your plant will drink even more. If the soil stays too wet, roots drown and rot. So balancing these factors is the heart of successful anthurium clarinervium care.
Pro Tips for Thriving Anthurium Clarinervium
- Use a well-draining mix with bark and perlite to let water flow freely yet retain moisture.
- Water in the morning so excess moisture evaporates during the day.
- Place a humidity tray—pebbles with water underneath your pot—for steady moisture around the leaves.
- Keep a close eye during winter on watering frequency to avoid root issues.
- Consider a small humidifier especially if you live where central heating dries the air out.
Want to geek out more about humidity and temperature—and how they affect your beloved houseplants? This guide on optimal temperature and humidity for indoor plants shares some solid science-backed tips that can really help.
And if you’re keen for a real deep dive on Anthurium clarinervium watering habits and soil specifics, check out this detailed Anthurium clarinervium care guide to keep your plant thriving like a champ.
So, next time you’re about to grab the watering can, remember it’s not just water—it’s a subtle balancing act of moisture and air. Nail this, and you’ll be rewarded with those stunning velvety leaves glowing brighter than ever.
Step 3: Selecting and Preparing the Best Soil Mix
Alright, here’s the thing about anthurium clarinervium care that often trips people up: the soil. You can water just right and keep humidity in check, but if your soil mix isn’t up to snuff, your plant’s gonna struggle.
Think about it like this — roots need space to breathe and a bit of grip to hold on tight, but they hate sitting in soggy soggy mud. So, selecting a soil mix that strikes that perfect balance between moisture retention and drainage is non-negotiable.
What Makes a Great Soil Mix for Anthurium Clarinervium?
You want something chunky yet light—kind of like the difference between a cozy blanket and a suffocating one. For this beauty, the ideal mix mimics its natural rainforest home where organic matter and air flow freely around the roots.
That means a combo of things like chunky bark (orchid bark works great), chunky perlite for aeration, and a bit of peat or coco coir for modest moisture retention.
If you’re staring at bags of potting soil wondering if it’ll work, chances are it’s too dense. Regular potting mix often compacts too much and holds onto water longer than you want.
So, layering in chunky elements avoids that trap—letting water flow through quickly while still giving roots something to grab on to.
Getting Your Hands Dirty: Mixing Your Own Soil
And hey, don’t stress if you don’t find a perfect premixed soil—it’s actually kind of fun to whip up your own blend.
Here’s a simple recipe that’s won hearts among aroid lovers:
- 40% orchid bark – for chunky air pockets
- 30% perlite – keeps things airy and drains excess water
- 20% coco coir or peat moss – retains just enough moisture
- 10% activated charcoal – keeps soil fresh and prevents root rot
Mix these well, and you’re basically building a breathable, moisture-smart playground for your anthurium roots.
And if you want a little extra oomph, there are organic additives to feed the soil microbes—those little soil helpers that boost nutrient uptake and stabilize pH.
Products like Root Tonic with humic acid and kelp do wonders. They encourage a thriving root zone by nurturing symbiotic microbes, helping your plant grab nutrients more efficiently.
What About Repotting Time? How to Prep Your Mix
When repotting, wet your mix slightly first—it shouldn’t feel soaked, just damp like a wrung-out sponge. That way, it’s easier to work with and gives your roots a cozy start without drowning them.
Speaking of repotting, it’s a golden chance to check those roots—healthy ones are firm and white, not mushy or dark.
After planting, resist the urge to water immediately unless the mix feels bone dry—sometimes you want the soil to settle a bit first.
Quick Comparison Table: Soil Mix Ingredients for Anthurium Clarinervium
| Component | Purpose | Notes |
|---|---|---|
| Orchid Bark | Provides chunky texture and airflow | Choose medium to large chunks for best drainage |
| Perlite | Increases aeration and prevents soil compaction | Lightweight and sterile, won’t hold water |
| Coco Coir / Peat Moss | Retains moisture without waterlogging | Coco coir is more sustainable than peat moss |
| Activated Charcoal | Keeps soil fresh and absorbs toxins | Optional but helpful to prevent root rot |
So, why does this soil mix matter so much? Because anthurium clarinervium care is really about mimicking its natural vibe—well-aerated, humus-rich forest floor, not soggy garden soil.
If you nail the soil, you’re already halfway to those gloriously venous leaves flourishing in your space.
Wondering where to find these ingredients? Specialty garden stores and online plant shops tend to carry good quality orchid bark and perlite, or you can grab a premix designed for aroids and tweak it to match.
And oh, one last heads-up: avoid soil that’s packed with fertilizers or moisture-retaining polymers if you can. It's tempting to go for "all-in-one" mixes, but oftentimes they don’t suit anthurium clarinervium’s sensitive roots.
Keep it chunky, keep it airy, and let your plant whisper thanks with each new leaf unfurling.
Step 4: Fertilizing and Feeding Your Anthurium Clarinervium
Here’s the deal: fertilizing your Anthurium clarinervium isn’t rocket science, but it’s definitely one of those care steps where less is more. You might be tempted to go all out, thinking more feed means bigger, leafier plants. Spoiler alert: it can actually stress the poor thing.
Think about how this plant lives in the wild — perched on tree branches where nutrients are a little scarce and soak up when it rains. So, you don’t want to douse it in heavy fertilizers that could fry those sensitive roots.
Picking the Right Fertilizer
So, what kind of fertilizer should you reach for? A balanced formula like a 10-10-10 (Nitrogen-Phosphorus-Potassium) works well if you’re just looking to maintain the plant’s health and vigor. But if you’re hoping to nudge it towards producing those rare spathes—the actual flowers hidden behind the showy leaves—go for something a bit higher in phosphorus, like a 1-2-1 ratio. This encourages bloom production without overwhelming the plant.
Liquid fertilizers tend to be your best bet here. They’re easier to control and distribute evenly through watering. You’ll find that feeding with a diluted mix gives the plant exactly what it needs without risk of burning roots.
How Much and How Often?
Here's the golden rule for feeding anthuriums: always dilute your fertilizer. Using it at a quarter strength is a safe bet. I know some say half strength works, but honestly, I like to play it safe—these plants are sensitive.
During the growing season, which is basically spring through summer, feeding every 3 to 4 weeks is plenty. If you’re using a slow-release fertilizer, once or twice per season is enough. Remember, potted plants tend to drain nutrients faster than those growing outdoors because they don’t have the ecosystem of soil to replenish nutrients naturally.
And hey, if you spot yellowing leaves despite proper watering and light, bumping up feedings just a bit can be a good troubleshooting step. But don’t rush—it’s a balancing act.
What Happens If You Overfeed?
We’ve all done it. Maybe you got too enthusiastic. Too much fertilizer can actually burn your Anthurium’s roots, leading to rot and poor leaf health.
If you suspect overfeeding, don’t panic. Just flush the soil with clean, filtered water—pour enough to run through the pot about four times. This washes away excess salts and fertilizer residues. After a few hours of drainage, pop your plant back in its spot and give it some breathing room.
Tips for Feeding Success
- Don’t fertilize when your plant is dormant or in the cooler months—save it for spring and summer.
- Use a fertilizer free of urea to avoid root burns; products like Dyna-Gro Grow are highly recommended for aroids.
- Always check your potting medium moisture before feeding; feeding dry soil isn’t effective.
- If you’re feeding regularly, occasionally check for salt buildup on soil surface and repot if necessary.
By giving your Anthurium clarinervium just the right meal—considerate, infrequent, and properly diluted—you’ll help those leaves stay thick, rich, and velvety, just like you dreamed.
If you’d like a deeper dive into choosing fertilizers tailored to Anthuriums and their bloom habits, this comprehensive guide on Anthurium fertilization breaks down ratios and timings beautifully.
Bottom line? Nail the feeding routine, and you’ll have a thriving, happy Anthurium clarinervium to wow your plant-loving friends. Ready to mix your first batch?

Step 5: Repotting and Propagation Techniques
Ever feel that tug-of-war moment with your Anthurium clarinervium? You’re spotting roots sneaking out the drainage holes, or your plant’s growth seems to have hit a frustrating pause. It’s like — does it need a bigger pot or just a little more patience? Let’s unravel that together.
When’s the Right Time to Repot?
Here’s the thing: Anthurium clarinervium likes to be just a bit snug in its pot. Unlike some plants that scream “Help, I’m root-bound!” this beauty will tolerate some crowding. So don’t rush to repot the second you see roots peeking out.
Instead, watch for signs like new leaves not growing larger or yellowing that doesn’t seem linked to light or watering. These subtle hints often mean the soil’s nutrient pull is maxed out or the roots are truly outgrowing their space. If the pot feels rock-solid when you press it and growth has stalled, that’s your green light to repot.
And hey, if your Anthurium’s been happily sitting in the same soil for over 2 years, freshening up the potting mix is a smart move—even if the roots aren’t cramped. Over time, old soil breaks down, compacts, and loses aeration, which can slow your plant’s mojo.
Prepping for Repotting: What to Know
First off, do NOT repot right when your plant is pushing out a fresh leaf or flowering. That’s like interrupting your friend mid-conversation. Wait until it has a moment of calm to avoid shocking it.
Next, choose a pot just one size larger than the current one. Oversized pots hold too much moisture, tempting root rot on your lovely aroid. Clear plastic pots are a neat trick—they let you check root health without uprooting your whole plant.
For your potting mix, stick to chunky, airy blends. Think coarse pine bark, charcoal chunks, or leca balls mixed with some sphagnum moss or coconut coir. This mimics the natural epiphytic vibe of Anthurium clarinervium, ensuring roots get plenty of airflow while staying moist but never soggy. Avoid peat moss—it packs down too much and isn’t exactly the eco-friendly choice.
Step-by-Step Repotting
Ready to get your hands dirty? Here’s a gentle approach:
- Loosen the root ball by gently squeezing the pot or tipping the plant out.
- Shake off loose old soil—don’t reuse it because mineral salts and pathogens can hide there.
- Don’t panic if roots are attached firmly to bark chunks; carefully tease them without ripping. Healthy roots are precious.
- Place your plant in the new pot with fresh mix, making sure roots spread naturally, not cramped or twisted.
- Water well but don’t drown it—just enough to settle the soil around roots.
This hands-on method, inspired by detailed guides like those from Plant Girl Boss, helps avoid stress and sets you up for a happy plant bounce-back.
Propagating Your Anthurium Clarinervium
Now, about growing your collection without buying new plants—propagation is your friend. The classic technique with Anthurium clarinervium is division, which is as satisfying as it sounds.
Here’s how I’d do it: When repotting, gently separate the root ball into sections. Each should have a good handful of roots and at least a couple leaves (or growth points). If it feels tough, use a clean, sharp knife to divide—but be gentle.
Pop each division into its own pot with fresh airy mix, water lightly, and give the plants some privacy in indirect light while they recover. Think of it as moving into a new place—it takes a bit to settle in.
Curious to understand more about the needs of your new baby plants? This Plantura guide on Anthurium clarinervium care dives into propagation and indoor growing conditions with a lot of detail.
With the right timing and tender care, repotting and propagating your Anthurium clarinervium isn’t just maintenance—it’s a power move to keep your tropical gem thriving and multiplying. So next time your plant’s got that cramped feeling, you’ll know exactly what to do without the guesswork.
Common Problems and How to Troubleshoot Them
Let me guess — you’ve poured your heart into your Anthurium clarinervium, only to spot some weird leaf spots or droopy leaves, and suddenly you’re wondering where you went wrong. I get it. These plants aren’t just foliage; they’re living puzzles.
One of the most frequent trouble signs is leaf discoloration — yellowing or browning leaf tips that scream, “Hey, something’s off!” Usually, this means watering isn’t quite right. Too much water suffocates the roots, leading to rot. Too little, and the plant dries out, causing crispy edges. The fix? Remember, root rot is a silent killer, so stick to a chunky, well-draining aroid mix, like the one we talked about earlier, and only water when the top inch of soil feels dry.
Ever seen those puffed-up, water-soaked bumps on your leaves? That’s oedema. It sounds fancy, but it’s basically your plant’s cells bursting because they’re holding onto more water than they can handle. This often happens when the balance between watering, humidity, and airflow is off. Morning watering is your secret weapon here — it gives leaves a chance to dry during the day, reducing this risk. Also, boosting ventilation can save your plant from this annoying condition.
Now, what about wilting? Wilting can be tricky because it sometimes looks like the plant’s thirsty, but often it’s overwatering causing root damage. Here’s a trick: if your pot feels light when you lift it, the plant probably wants a drink. If it feels heavy and still droopy, pull back on watering to avoid drowning those roots.
Did you know pests love to sneak in when your humidity is off? Spider mites and aphids are the usual suspects. Mist your plant (especially new leaves) or give it a gentle shower now and then to keep those critters at bay. Just don’t rely on misting as a humidity booster — for serious humidity gains, get a humidifier.
And if you’re using moisture meters, a heads-up: they often don’t work well with chunky, airy mixes. Your best bet? Watch your plant and your pot’s weight. This hands-on approach beats gadgets any day.
For a deeper dive into watering nuances and how roots really work, check out this detailed guide on watering anthuriums. And if you want the lowdown on Anthurium clarinervium specifics in its native conditions, this resource on its natural habitat is priceless.
So, what’s your takeaway? Troubleshooting is less about panic and more about tuning in. Feel your plant’s pulse, adjust watering carefully, keep the air moving, and you’ll see your Anthurium clarinervium turn from stressed to stunning.
Conclusion
Taking care of your Anthurium clarinervium isn’t about following a strict set of rules—it’s really about tuning in, noticing the little whispers your plant sends your way. You’ve seen how watering, humidity, pests, and soil all play a role, but here’s the kicker: patience and observation are your best friends.
Think about it like this—would you expect a friend to thrive if you never paid attention to their mood or needs? Same goes for your plant. When the leaves start drooping or the soil feels off, that’s its way of telling you something’s up.
So what’s next for you and your spade of Anthurium clarinervium care? Keep feeling that pot’s weight, watch new leaves closely, and don’t be scared to adjust your routine as you learn. Remember, every little tweak—from misting on dry days to holding back water when the soil’s still damp—makes a huge difference over time.
And hey, if you want to go the extra mile, using custom soil-less mixes and organic foliage feeds (just like the ones we at FAS provide) can seriously boost your plant’s health without the guesswork.
In the end, it’s not about being perfect. It’s about being present. So grab your watering can, take a deep breath, and enjoy the journey with your Anthurium clarinervium—it’s definitely worth it.
Frequently Asked Questions about Anthurium Clarinervium Care
So, you've been nurturing your Anthurium clarinervium, and naturally, a bunch of questions start bubbling up. You're not alone—these plants, with their stunning heart-shaped leaves and velvety texture, invite curiosity and sometimes a little confusion. Let’s tackle some of the most common questions folks ask, and hopefully, clear things up for you.
How often should I water my Anthurium clarinervium?
Great question! The quick answer: not too often, but not too little either. Think of it like Goldilocks—your plant prefers soil that’s moist but not soggy. Usually, watering once every 7 to 10 days does the trick, but it really depends on your home's humidity and temperature. Here’s a little trick: stick your finger into the soil about an inch deep—if it feels dry, it’s time to water. If it’s still damp, wait a couple more days.
Why are my Anthurium leaves turning yellow or brown?
Ever caught your plant looking a little sorry with yellow or crispy brown leaves? It’s like when you forget to drink water all day—your plant’s throwing a mild tantrum. Yellow leaves often signal overwatering or poor drainage. Brown edges? Probably dry air or too much direct sunlight. Try keeping it in bright, indirect light and use FAS’s custom soil-less mixes to boost drainage. Your Anthurium will thank you.
Can I grow Anthurium clarinervium outdoors?
Sure, if you live somewhere that feels like a tropical greenhouse. These plants love warm temps—ideally between 65-80°F—and high humidity. If your region gets chilly or dry, it’s better to keep it indoors or in a sheltered spot like a screened porch. And honestly, they thrive best in controlled indoor environments, which is why many plant lovers swear by them as perfect houseplants.
What’s the best soil for Anthurium clarinervium?
Here’s the thing: these beauties crave airy, well-draining soil. Heavy, compacted potting soil can suffocate their roots. Many folks, including us at FAS, recommend a soil-less mix with components like orchid bark, perlite, and charcoal. This mixture mimics their natural forest floor habitat—loose, rich, and full of life.
How do I increase humidity for my Anthurium?
Humidity is almost like a comfort blanket for Anthurium clarinervium. If your home feels dry, especially in winter, try misting the leaves daily or placing the pot on a tray with water and pebbles. Humidifiers work wonders, too—think of it like bringing the tropics indoors. Just watch out for stagnant water, which can invite pests.
Are pests common with Anthurium clarinervium? How do I handle them?
Sadly, yes. Spider mites, aphids, and mealybugs can sneak in when you’re not looking. Regularly inspect your leaves and stems—especially the undersides. If you spot unwelcome guests, wipe them off with a mild soap and water solution or use insecticidal soap. Keep your air fresh but humid to discourage pests. And if things get hairy, reaching for organic foliage feeds or treatments, like ones we offer at FAS, can help your plant bounce back.
Alright, so does this all feel a little more manageable now? Remember, with anthurium clarinervium care, tuning in to your plant’s cues is your best strategy. Try mixing and matching these tips, observe, and adjust. It’s a bit like finding the perfect recipe for your morning coffee—personal, rewarding, and definitely worth it.