

Anthurium Repotting: A Step-by-Step Guide to Thriving Aroid Care
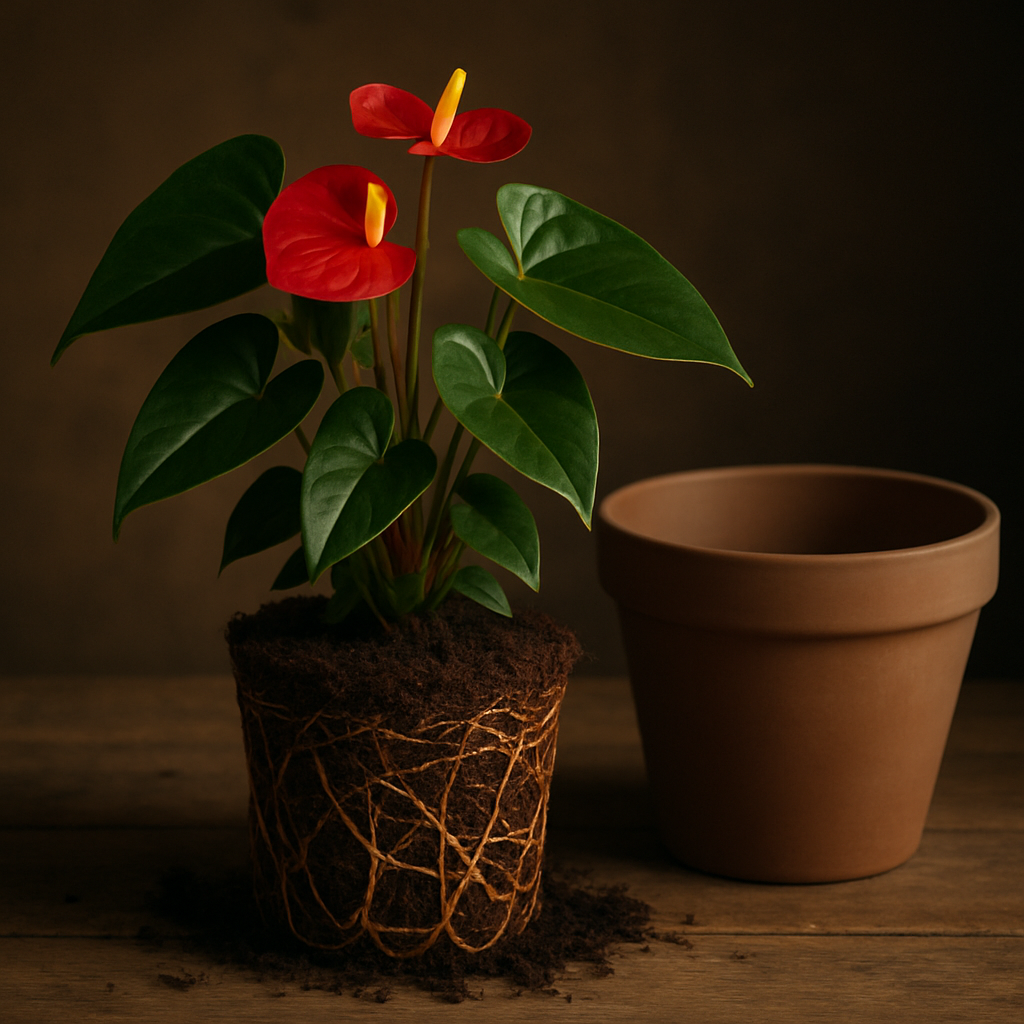
Anyone who's spent time caring for anthuriums knows these stunning plants aren’t just about beauty—they demand a little TLC to keep thriving. One of the essential care steps that often trips up even the most dedicated plant lovers is anthurium repotting. It might sound simple, but if you rush in without the right know-how, you could do more harm than good.
So, why does anthurium repotting matter so much? These tropical beauties have delicate root systems that need just the right environment to flourish. Over time, their pots can become cramped, the soil can break down, or nutrients can deplete, which stresses your plant. Repotting doesn’t just give roots more space—it refreshes their growing medium, encouraging new growth and vibrant blooms.
But when exactly should you repot? And how do you avoid the common mistakes that cause root rot or shock? If you’ve caught your anthurium looking smaller, its roots circling the pot, or the soil not draining well, it’s probably time to dive into repotting.
Imagine your anthurium thriving in a perfectly balanced potting mix designed specifically for aroids—that’s the kind of boost a repot can deliver. Luckily, you don’t have to guess what mix works best; we have insights that will help you craft the ideal soil blend tailored for your anthurium’s unique needs.
Feeling a bit overwhelmed? Don’t worry—this guide walks you through everything from prepping your plant and picking the right time, to selecting the correct pot and mix, ensuring your anthurium bounces back quickly and looks stunning year-round.
Ready to transform your plant care routine? Let’s dive into all the essentials of anthurium repotting, so you can keep your leafy companion happy and healthy for years to come. And if you want a head start on what kind of potting mix to use, check out our detailed walkthrough on how to create the ideal anthurium potting mix for thriving aroids. Trust me, the right soil makes all the difference.
TL;DR
Wondering when and how to repot your anthurium? Keep an eye on root health, pot size, and soil drainage to know the right timing. Using a well-draining aroid mix and a slightly larger pot helps your plant thrive without risking root rot or shock.
This guide covers everything you need for successful anthurium repotting—from preparation to aftercare—so your leafy companion stays vibrant and happy year-round.
Step 1: Knowing When to Repot Your Anthurium
Repotting your anthurium isn't just a plant chore—it's essential care that can make the difference between a thriving tropical beauty and a struggling houseplant. But how can you tell when it's time to repot? Let’s dig into the signs and best timing to ensure your anthurium stays vibrant and healthy.
Why Timing Matters for Anthurium Repotting
First things first: picking the right moment to repot can significantly reduce stress on your plant. Anthuriums grow actively in warm, humid conditions, typically flourishing during spring and early summer. This is when they bounce back quickest from any root disturbance caused by repotting.
If you attempt to repot during colder months or their dormancy, you risk shocking your plant, which can slow growth or even cause decline. So, ideally, plan your anthurium repotting sessions between early spring and midsummer to sync with your plant’s natural growth rhythm. Many enthusiasts agree this seasonal window creates the best environment for recovery and robust new growth according to detailed expert guidelines.
Signs That Your Anthurium Needs Repotting
Wondering if your plant is ready for the upgrade? Here are the key indicators to look for:
- Root Bound Plant: When roots circle tightly around the inside of the pot or push through drainage holes, it’s a glaring sign your anthurium’s roots need more room to grow.
- Slow Growth or Reduced Blooming: If your anthurium seems stuck in a rut—its leaves smaller, fewer or no flowers—it might be starving in exhausted or compacted soil.
- Soil Condition Deterioration: Over time, the potting mix breaks down, compacts, and loses nutrients. If water pools on the surface or drains very slowly, the soil has likely degraded.
- Visible Salt or Mineral Buildup: White crust on the pot or old soil suggests mineral accumulation, which can harm root health.
- Top-Heavy or Leggy Growth: Anthuriums can get lanky, with long bare stems that struggle to support the plant. Repotting deeper lets you bury part of those bare stems and encourage new root growth.
These clues make your repotting decision much easier. If you spot even a few of these signs, your anthurium is likely begging for a bigger, fresher home.
How Often Should Anthuriums Be Repotted?
Regular maintenance makes a world of difference. Typically, anthuriums benefit from repotting every two to three years. This interval prevents soil from becoming compacted or nutrient-depleted and keeps roots lively.
But remember: each plant is unique. Some fast growers might need repotting sooner, while more mature or slow growers do fine for longer stretches between.
Note: If your anthurium is newly purchased, resist the urge to repot immediately unless you see signs of root bound stress. Give it a few months to acclimate in its original pot, then assess whether repotting will benefit it.
Preparing for Repotting: What to Expect
Prepping your anthurium for repotting can make the process smoother. A good tip is to water it thoroughly a few hours before you start. Moist roots handle repotting shock better and they're easier to work with when removing old soil.
Also, tidy up the plant by trimming away any yellow or dead leaves and faded flowers. This step helps focus the plant’s energy on root and new leaf growth during recovery.
Keep an eye on root health while you’re at it. If you see any mushy or rotten roots, prune them carefully to prevent further damage.
Ready for the next steps? In the following sections, you’ll learn how to choose the right pot and mix, plus step-by-step guidance for a smooth anthurium repotting session.
Remember, repotting pro tips can dramatically improve your plant’s health and flowering success. For an in-depth expert overview on timing and approach, check out this comprehensive anthurium repotting guide that covers everything from signs to best potting mixes.
Step 2: Preparing the Right Soil Mix for Anthuriums
When it comes to anthurium repotting, the soil you choose is as important as the pot itself. Why? Because the right soil mix sets the stage for your plant’s roots to breathe, grow, and thrive. Anthuriums are tropical plants, so their natural environment is loose, airy, rich in organic matter, and slightly acidic. If you’re still using regular potting soil, it’s time to rethink your mix.
So, what exactly makes an ideal soil mix for your anthurium? It's all about balance—combining ingredients that promote drainage, moisture retention, aeration, and nutrient availability.
Understanding Anthurium Soil Needs
Anthuriums hate soggy roots. Waterlogged soil can quickly lead to root rot, which is a major setback during repotting. That means your soil needs excellent drainage without drying out too fast. A slightly acidic pH level between 5.5 and 6.5 also helps your anthurium absorb nutrients efficiently.
To replicate their tropical rainforest homes, you want a soil mix that’s loose and well-draining but still retains some moisture. Ingredients like pine bark or fir bark mimic their natural growing conditions by providing chunky texture and slow nutrient release. Perlite or pumice ensures your soil doesn’t compact, allowing oxygen to reach every root tip. Organic components like coco coir or peat moss (though coco coir is more eco-friendly) hold moisture lightly and add organic goodness.
Why not just buy a ready-made potting mix? Because most commercial mixes don’t cater to tropical aroids like anthuriums. They tend to either hold too much water or lack enough aeration, which leads to poor root health. Customizing your soil mix means healthier roots and more vibrant blooms.Classic Landscapes explains.
DIY Basic Soil Mix Recipe for Anthuriums
Here’s a straightforward recipe that works wonders for most indoor anthuriums, especially if you’re just starting with repotting:
- 1 part fir bark or orchid bark (chunky pieces for aeration and drainage)
- 1 part coco coir (for moisture retention and organic matter)
- 1 part perlite or pumice (to keep the mix light and airy)
Mix these well until you have a loose, chunky mixture. If you want to boost nutrient content, add a small amount of worm castings or well-aged compost but keep it minimal to avoid soggy soil.
This blend encourages healthy root growth and prevents the common issue of root suffocation. If your plant is in a larger pot, you can increase the bark proportion slightly for better structure.A DIY mix guide with expert insights highlights why getting this balance right is key.
Advanced Soil Mix Options for Anthurium Enthusiasts
Ready to take your soil mix a notch higher? Consider these additional ingredients that elevate drainage and nutrient cycling:
- Horticultural charcoal: Absorbs impurities and excess moisture, helping prevent fungal issues and keeping soil fresh.
- Pumice: Extremely porous and lightweight, pumice boosts oxygen flow around the roots better than perlite in some cases.
- Tree fern fiber: Offers excellent aeration and moisture retention, making it ideal for rooting new anthurium cuttings or during repotting stress.
Combining these with your basic mix creates a rich, airy, and nutrient-friendly medium tailored to demanding anthuriums. Always ensure the particles are roughly similar in size to maintain an even texture and prevent separation inside the pot.
Here’s a sample advanced blend idea:
- 1 part fir bark
- 1 part coco coir
- 0.5 parts horticultural charcoal
- 0.5 parts pumice
- 0.5 parts worm castings or organic fertilizer
Trust me, your anthuriums will thank you with lush leaves and more frequent blooming cycles.
Still wondering about the exact proportions or how to handle different pot sizes? Tips like adding a layer of lightweight clay pebbles or LECA to the bottom can improve drainage and prevent bottom rot, especially during repotting.
To get a clear visual on mixing and handling this soil, here’s a practical video that dives into preparing an ideal anthurium soil mix. Watch closely as the process unfolds step-by-step:
Putting effort into your soil mix may seem time-consuming at first, but it pays off massively in plant health and reduced repotting stress. Plus, the satisfaction of creating a personalized blend is a win for any anthurium lover.
For a deep dive into the ideal soil balance that classic landscapers recommend or expert aroid hobbyists swear by, check out these detailed resources:
- Classic Landscapes’ expert recommendations on anthurium soil – a thorough breakdown of ingredients and why they work
- Hoyatreasures’ DIY aroid soil mix – practical recipes and product suggestions for houseplant enthusiasts
- Classic Landscapes pH and drainage tips – crucial info about maintaining soil acidity that your anthurium craves
So, what’s stopping you from mixing the perfect soil and giving your anthurium the best chance at thriving after repotting?
Step 3: Choosing the Best Pot for Anthurium Repotting
When it comes to anthurium repotting, picking the right pot isn’t just about size—it’s about creating a happy home for your plant’s roots. The right container affects drainage, air circulation, and root health, all of which play critical roles in helping anthuriums thrive indoors. Let's dig into what you really need to look for.
Why Does Pot Selection Matter?
Think of your anthurium’s pot as the foundation of a skyscraper. Without solid support and proper infrastructure, everything else struggles. Anthuriums are tropical epiphytes in their natural environment, meaning they naturally cling to trees and get ample airflow around their roots.
Using a pot that retains too much moisture or restricts airflow can easily lead to root rot, a top culprit in houseplant struggles. Plus, since anthuriums don’t mind being a little snug, you don’t want to rush into a pot that’s too large. That can cause the soil to stay wet longer, increasing the risk of problems.
What Size Pot to Choose?
For repotting, the sweet spot is usually a pot only one to two inches larger in diameter than the one your plant is currently in. This gives roots space to spread without overwhelming them with excess soil that holds moisture.
Feeling unsure about what this means? Just remember: bigger isn’t always better. A pot that’s too large can actually hurt your beautiful anthurium.
Material Matters: Plastic, Ceramic, or Terracotta?
Each pot type brings different benefits and quirks for anthuriums:
| Pot Material | Benefits | Considerations |
|---|---|---|
| Plastic | Lightweight, retains moisture well, affordable | Less breathable—monitor watering closely to avoid soggy soil |
| Ceramic | Attractive finish, moderate breathability, holds moisture moderately | Heavier, can be more expensive, may crack in cold conditions |
| Terracotta | Highly breathable, excellent drainage, natural look | Dries out quickly—requires more frequent watering, fragile |
Do you want your anthurium’s soil to stay slightly moist longer or do you prefer the soil to dry out more quickly? That preference will guide whether plastic or terracotta might be better for your situation.
Drainage: The Most Crucial Feature
No matter what pot you pick, make sure it has plenty of drainage holes. Remember, anthuriums hate sitting in water. If your pot doesn’t allow excess water to flow out, you risk root rot.
Here’s a smart tip: even with good drainage holes, consider layering the bottom of the pot with lightweight clay pebbles or LECA. This improves water flow and keeps roots well aerated—exactly what your anthurium’s tropical roots crave.
Self-Watering Pots: Useful or Risky?
Some gardeners swear by self-watering pots, especially if they tend to over- or under-water. However, anthuriums can be sensitive to constant wet soil, so if you go this route, choose models that allow you to control moisture levels carefully. Monitoring is key here.
The Takeaway
Choosing the perfect pot for your anthurium’s repotting is a balance of size, material, and drainage. A pot just a bit larger than before, equipped with proper drainage and made from a material that fits your watering style, will set your plant up for success.
Want to learn more about ideal potting options for tropical plants? Check out The Spruce’s expert guide on growing anthuriums for deep insights on their preferences. For a practical look at pot types and soil considerations, exploring Classic Landscapes’ expert recommendations offers invaluable advice for indoor gardeners.
Ready to pick the pot that will help your anthurium flourish? Take your time selecting one that matches your plant’s needs and your care rhythm. Your lush, vibrant anthurium will thank you!
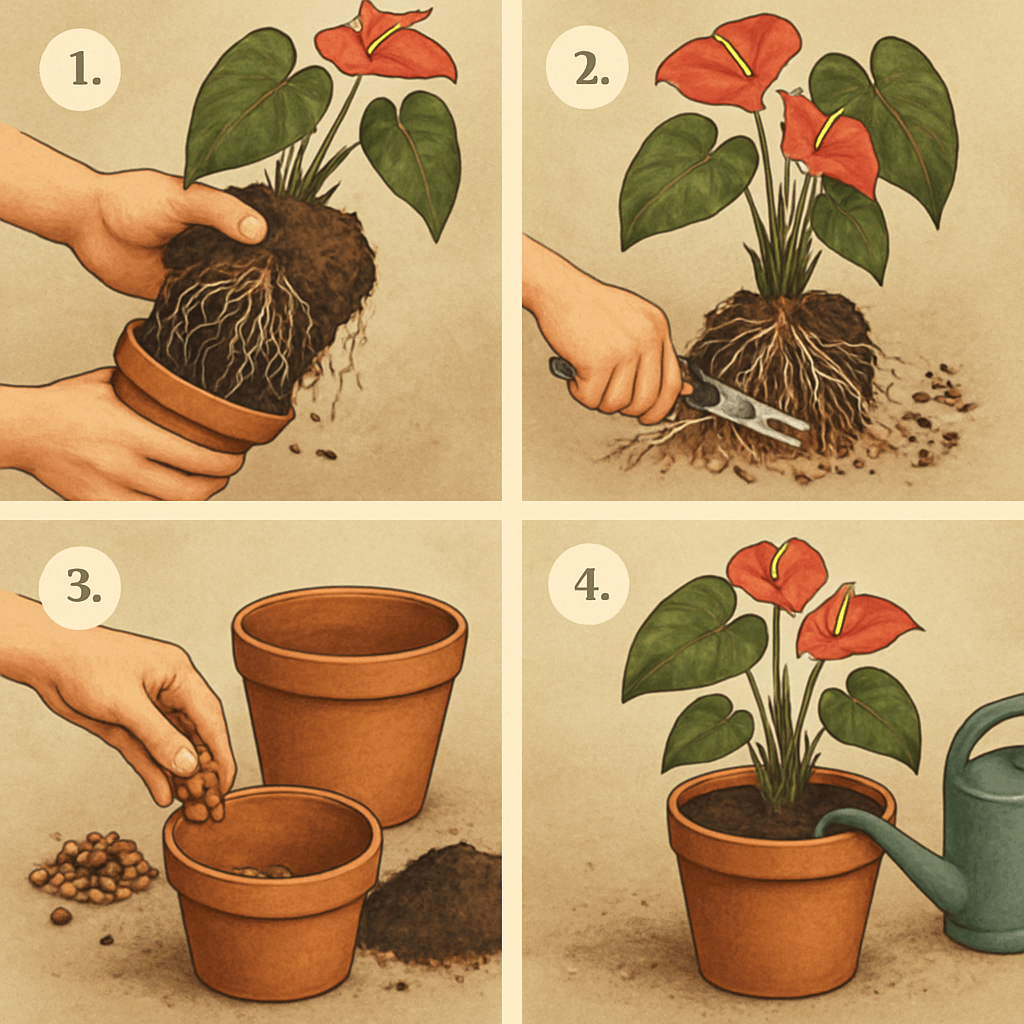
Step 4: The Anthurium Repotting Process: Step-by-Step
Ready to give your anthurium a fresh new home? Repotting your anthurium might seem intimidating at first, but with the right steps, you’ll be setting your plant up for lush growth and vibrant blooms. Let’s walk through a clear, hands-on guide so you can confidently tackle anthurium repotting like a pro.
Step 1: Gather Your Supplies
Before you start digging in, pause for a moment and make sure you have everything ready. You’ll need a clean new pot (preferably slightly larger with good drainage), fresh potting mix tailored for anthuriums, gardening gloves, pruning shears, and a trowel or small shovel.
If you haven’t perfected your potting mix yet, check out our detailed walkthrough on how to create the ideal anthurium potting mix to help your plant thrive.
Step 2: Prepare Your Workspace
Choose a tidy spot with easy cleanup—repotting can get a bit messy! Lay down newspaper or a tarp to catch soil spills. Have a container or bag ready for old soil and plant debris.
Working in a well-lit space helps you better examine roots and leaves during the process. Plus, it makes for a more enjoyable experience.
Step 3: Remove the Anthurium from Its Current Pot
Gently turn the pot on its side and tap the base to loosen the root ball. Avoid pulling from the stem to prevent damage. If the plant is stubborn, use a dull knife along the pot edges.
Once out, take a moment to inspect the roots. Are they white and firm? Great! Any mushy, black, or rotten roots need to be trimmed to keep your plant healthy.
Step 4: Prune as Needed
Use sanitized pruning shears to cut away dead or diseased roots and yellowed or damaged leaves. Cleaning up the plant at this stage supports vigorous new growth.
Curious why pruning helps? Removing unhealthy parts redirects the plant’s energy toward repairing and expanding healthier tissues.
Step 5: Add Drainage Layer to New Pot
Before filling the new pot, add a 1–2 inch layer of lightweight clay pebbles or LECA at the bottom. This ensures proper drainage, prevents root rot, and mimics the airy conditions anthuriums love.
If you’re keen to learn why drainage layers matter so much for tropical plants, check this expert YouTube guide on proper potting and drainage techniques for more insights.
Step 6: Fill Partway with Fresh Potting Mix
Pour enough of your custom mix into the pot so that when you place the root ball on top, the crown sits about an inch below the rim. Anthuriums don’t like being buried too deep, so this spacing helps aerate the base.
Step 7: Set Your Anthurium in the New Pot
Carefully place the plant in the center of the new container. Hold the root ball steady as you add potting mix around it, pressing gently to eliminate air pockets without compacting the soil too much.
Remember, over-compaction suffocates roots and invites fungal issues. Lightly tamping down the mix strikes the perfect balance.
Step 8: Water Thoroughly But Gently
Give your repotted anthurium a good drink of water to help the soil settle and encourage root establishment. Use room-temperature water and avoid flooding—just enough to moisten evenly.
Let the pot drain completely before placing it back in its spot to prevent waterlogging.
Step 9: Find the Right Spot for Recovery
After repotting, your anthurium needs a gentle transition. Keep it in bright, indirect light and away from drafts or direct sun until it acclimates, usually a couple of weeks.
Monitoring humidity during this time helps immensely since anthuriums thrive in moist air—a misting routine or humidifier nearby can make a big difference.
Wondering about the best post-repotting care tips? This thorough video on aroid repotting and care breaks down the essentials you want to follow.
Final Thoughts
See? Anthurium repotting isn’t rocket science. It’s about gentle handling, choosing the right materials, and understanding your plant’s needs. With these clear steps, you’re on your way to keeping your anthurium happy and thriving season after season.
Don’t forget, repotting is also a chance to upgrade your plant’s soil environment. For a deeper dive into getting that perfectly balanced root zone, explore our guide on creating the ideal anthurium potting mix. Your plant will thank you!
Step 5: Post-Repotting Care to Ensure Thriving Growth
Congratulations! You’ve just finished the critical process of anthurium repotting. But hold on—your work doesn’t stop here. How you care for your plant right after repotting can make or break its recovery and future growth.
Keep the Environment Just Right
Immediately after repotting, your anthurium is more vulnerable. It’s adjusting to new soil conditions, a fresh root space, and sometimes a bit of root disturbance. So, your first priority is to create a gentle environment that reduces stress.
Opt for bright, indirect light—think north or east-facing windows. Direct sun can scorch tender new roots and leaves that are still sensitive. If you notice leaves looking droopy or paler than usual, it’s a sign your plant might be getting too much light or stress.
Humidity is another game-changer in post-repotting care. Anthuriums thrive in 60-80% humidity, so consider setting up a humidifier nearby or misting your plant lightly every day. This mimics their natural tropical habitat and speeds recovery.
Water Wisely to Support New Roots
Watering post-repotting requires balance. You don’t want to drown the roots, but leaving them dry won’t help either. After repotting, wait about 3-5 days before watering—this gives any minor root injuries a chance to heal and lowers the risk of rot.
Once you resume watering, aim to keep the soil consistently moist but never soggy. Well-draining soil is key here, and since you’ve done your anthurium repotting using a custom soil-less mix, this should naturally promote good aeration.
Wondering how often to water? A good rule of thumb is to stick your finger about an inch into the soil—if it’s dry, it’s time to hydrate. Overwatering is a common mistake, so err on the side of caution.
Feed Your Anthurium with Care
Hold off on heavy fertilizing immediately post-repotting because your plant is already adjusting. However, after 4-6 weeks, you can gradually start feeding with a balanced, diluted fertilizer specifically formulated for aroids. This encourages new growth without overwhelming your plant’s stress response.
FAS offers organic foliage feeds designed to complement your soil-less mix perfectly, promoting vibrant, healthy leaves and robust roots.
Watch Out for Trouble Signs
It’s absolutely normal to see some leaf yellowing or even slight leaf drop after repotting, but persistent wilting, mushy stems, or unpleasant odors can indicate overwatering or root issues. If you spot such signs, act quickly by checking root health or adjusting watering habits.
Do you know that pests like spider mites or scale can sneak in during this vulnerable phase? Regularly inspect your foliage and stems, and treat early if infestations appear. Natural insecticidal soaps work great without harming your plant.
Give It Time and Patience
Lastly, remember that anthurium repotting is just one part of a bigger growth story. Plants take time to settle, and your care routine during this adjustment period shapes their long-term health.
By providing steady humidity, balanced watering, gentle light, and attentive monitoring, you’re setting your anthurium up for thriving growth.
Looking for precise tips to keep your repotted anthurium flourishing? Many indoor plant enthusiasts recommend tracking moisture levels and light exposure carefully during the first few weeks post-repotting according to this expert guide. Meanwhile, understanding the subtle signs of repotting stress can prepare you to respond promptly as detailed in this comprehensive care resource.
Now that you’ve mastered post-repotting care, your beautiful anthurium will reward you with lush foliage and stunning blooms season after season.
Common Mistakes to Avoid When Repotting Anthuriums
Repotting your anthurium can be a game-changer for its health and growth — but it’s easy to stumble into some pitfalls that could do more harm than good. Have you ever repotted a plant and then wondered why it looked worse afterward? Let’s unpack the common mistakes that often trip up anthurium enthusiasts so you can avoid them.
Overwatering Right After Repotting
One of the top mistakes is overwatering immediately after repotting. Your anthurium's roots may be stressed, and soggy soil can quickly lead to root rot. Anthuriums thrive when the soil is well-draining and allowed to dry slightly between watering. Resist the urge to water heavily just because you repotted — giving roots a little breathing room is key. For watering guidelines that really work, check out this expert advice on the most common anthurium care errors.
Using Inappropriate Potting Mix
Not all potting media are created equal for anthuriums. Using dense or poor-draining soil is a sure way to suffocate the roots. Anthuriums prefer an airy, well-drained mix that holds some moisture but doesn’t stay wet. A mix of orchid bark, sphagnum moss, and peat works wonders. If you’re repotting with homemade soil-less mixes, make sure it mimics their natural tropical conditions.
But, what if you’re dealing with delicate seedlings or young plants? Uprooting or messing with roots too harshly can set them back. Instead, transplant seedlings with the soil plug intact to protect fragile roots — this method minimizes transplant shock and helps your plant bounce back faster. This practical strategy is elaborated further in this detailed guide to transplanting seedlings.
Ignoring Proper Drainage
Do you sometimes skip adding drainage holes because you worry about the mess? Resist that temptation! Proper drainage is essential to prevent water from pooling at the roots, which leads straight to root rot. If you love the look of a decorative pot without holes, consider using a smaller plastic pot with drainage inside it, then placing that inside your decorative container.
Repotting at the Wrong Time
Timing is everything. Repotting when your anthurium is actively blooming or under stress can trigger shock or flower drop. The best window is during its active growth phase, usually spring or early summer. Also, waiting too long to repot when the roots have outgrown their space causes stunted growth and declining plant health.
Failing to Inspect and Prune Roots
When repotting, don’t just plop your plant into new soil without a glance at the roots. Check for signs of rot or damage like mushy or black roots. Trim these off gently with sterilized scissors. This not only promotes healthy root growth but also prevents disease from spreading.
Getting Too Rough with the Roots
Roots are delicate, especially for young anthuriums. Rough handling or untangling roots aggressively can cause breakage, stressing the plant. Always tease roots softly, if at all, and never strip away soil unnecessarily.
So, what should you do next?
When you repot, plan ahead. Use a light, airy soil mix, water sparingly at first, check your plant’s roots carefully, and pick the right season for the job. Paying attention to these details makes all the difference.
Repotting your anthurium shouldn’t be scary or complicated — with the right approach, it’s a positive growth step your plant will thank you for. For more in-depth care tips, delve into these common pitfalls to avoid with anthurium care and the methods to protect tender roots during transplanting. Your thriving anthurium awaits!
Frequently Asked Questions About Anthurium Repotting
When is the best time to repot my anthurium?
Most experts recommend repotting anthuriums during the spring or early summer. This period corresponds with the plant’s active growth phase, allowing it to recover quickly and adapt well to its new home. Avoid repotting during fall or winter when the plant’s growth slows down—it may struggle to bounce back.
How often should I repot my anthurium?
Typically, repotting every 1 to 2 years is ideal. However, it depends on the growth rate and pot size. If you notice roots poking out of drainage holes, soil drying out rapidly, or stunted growth, it’s a sign your plant needs fresh soil and more room. Don’t wait too long—crowded roots can stunt your anthurium’s beauty and health.
Do I need to prune the roots during repotting?
Yes, you should inspect the roots carefully. Trim off any that appear rotted, mushy, or blackened using sterilized scissors. Healthy roots are firm and white or light tan. Removing damaged roots helps prevent disease and encourages healthy new growth. Be gentle though—handling roots roughly can cause unnecessary stress to your anthurium.
Can I repot using regular potting soil?
Regular potting soil is often too dense for anthuriums, which prefer well-draining, airy mixes. A custom soil-less mix with components like orchid bark, sphagnum moss, and perlite works best. These allow for proper aeration and moisture retention, replicating the epiphytic conditions anthuriums thrive in. If you want to try a DIY approach, mix equal parts of these materials for an ideal substrate.
How much water should I give after repotting?
Hold back on heavy watering right after repotting. Your newly repotted anthurium needs time to settle in. Lightly water just enough to moisten the soil. Overwatering at this stage can lead to root rot because fresh cuts on roots are vulnerable. Gradually increase watering frequency as you observe new growth and the soil’s drying patterns.
Is it necessary to sterilize pots before repotting?
Definitely. Sterilizing your pot, whether new or reused, helps prevent transferring pathogens to your plant. Use a mild bleach solution or boiling water to disinfect the container, and make sure it has adequate drainage holes. This simple step can save your anthurium from unneeded stress and diseases down the road.
What signs show my anthurium is stressed after repotting?
Wilting, yellowing leaves, or slowed growth may appear initially—they’re common signs the plant is adjusting. However, if these symptoms persist beyond a couple of weeks, double-check your care routine. Perhaps the soil is too wet, or the plant is in a drafty spot. Being attentive and patient will help your anthurium bounce back strong.
Wondering if there’s more to unearth about repotting? Sometimes, a bit of trial and error is part of the journey. But with these FAQs, you’re well-equipped to give your anthurium the jumpstart it deserves.
Conclusion
Repotting your anthurium isn’t just a routine chore—it’s a vital step to keep your plant thriving and vibrant. With the right soil, pot choice, and gentle care, you give your anthurium the best chance to grow stronger and bloom beautifully.
Remember, patience is key. After repotting, your plant might show signs of stress, but don’t rush into heavy watering or fertilizing. Let it settle into its new home. Over time, you’ll notice new growth and fresher foliage—that’s your green friend saying “thank you!”
Wondering how often you should repot? Typically, every 2-3 years or when roots outgrow the pot, but always trust your plant’s signals. Overcrowded roots or slow growth are red flags that it’s time for a change.
Thinking about elevating your repotting routine? Consider exploring custom soil-less mixes or organic foliage feeds tailored for anthuriums—these can boost health and flowering potential significantly.
In the end, anthurium repotting is less about perfect timing and more about attentive care. Check your plant regularly, adjust your approach as needed, and enjoy the rewarding process of nurturing a stunning houseplant.
If you’re looking for premium anthurium varieties or specialized plant accessories, FAS has you covered to make every repotting experience a success.